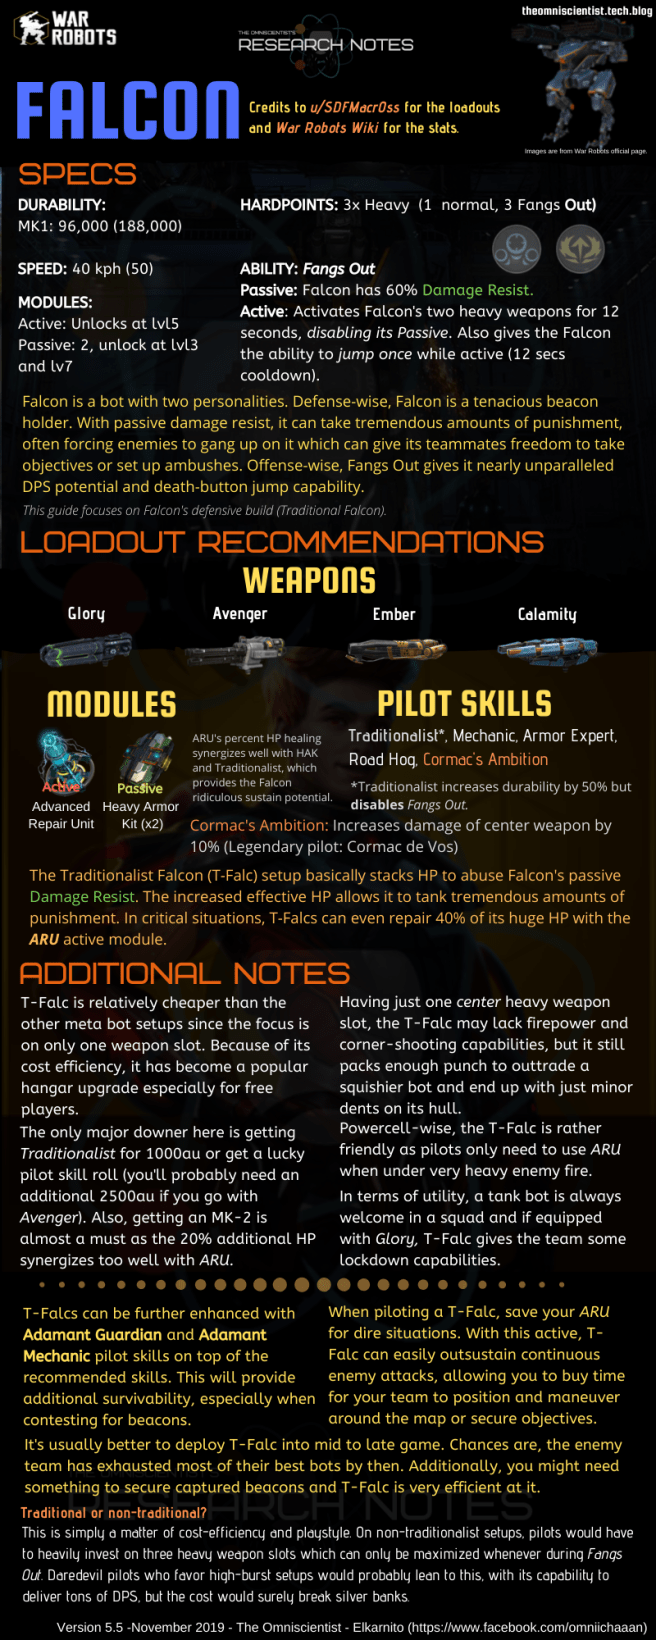
WARNING: This is by no means an in-depth guide to RDB, but just an account of my experiences playing the setup. Not for the faint of heart as it contains walls of texts. Still, I’ll be sharing my thoughts on how I play them, which might be useful to those who want to give them a try.
The RDB or “Russian Death Button” was the first “budget competitive” setup that I loved. It was way back when dashbots were the top kids. I’ve tried leadhose/rambo (punishers) griffins at first but can’t just seem to properly grasp its playstyle. Spirals dealt next to no damage while workshopping plasma would take too long.
I did some research and stumbled upon the “Russian Deathbutton.” I was skeptical at first, for some reason unbeknownst to me. I guess I did find it expensive and somehow, I’m still hoping that I’d get used to Punishers. Adding to that probably is my strange aversion to everything meta or popular. But then I was too hungry to win, and so I bit the bullet and spent my Ag into getting a pair of Tulumbas and Pins to my Griffin. I took it to the field and did my first jumpshot.
I was smitten.
What is RDB?
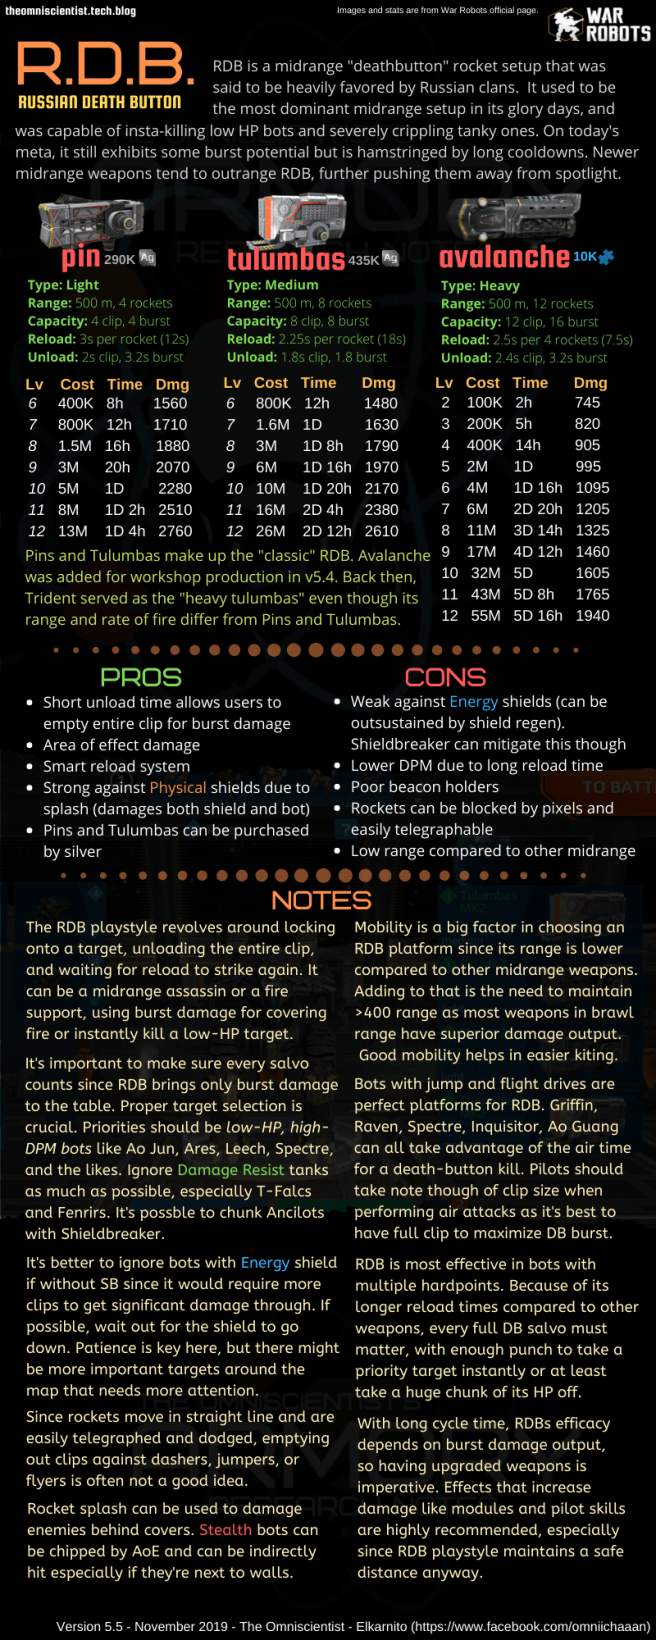
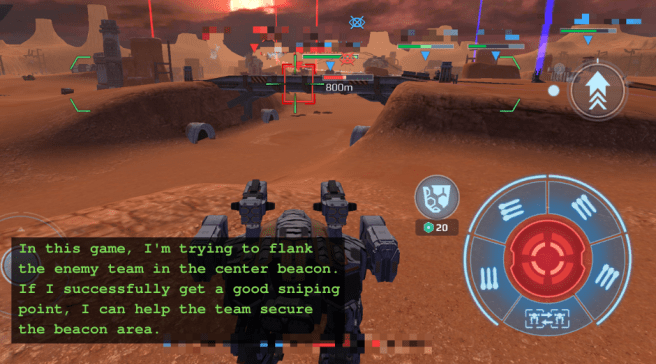
As mentioned in the image above, RDB is basically a midrange rocket setup (said to be) favored by the Russian clans. It’s the longer ranged version of the legendary deathbutton setup consisting of Orkans and Pinatas. With proper platform and good piloting, it can easily bully setups below 500 range. It’s mostly used for hit and run tactics, utilizing Griffins.
Like most projectiles, RDB rockets travel in a straight line, but faster than DBs. Still, skilled players can easily telegraph and dodge them, especially dodgebots. Skilled Haechi pilots were a bane, especially with its Energy shield which absorbs most of the rocket damage. Zeus Carnage was also a problem as it has superior range and Energy shield as well, same with leveled Molot Fujins that chipped my Griffins before I can get them to my effective range.
Since RDBs are simply “burst assassins,” it’s also imperative that they’re heavily upgraded so as to make any impact in the field. Low-leveled RDBs are like gimped mages in MOBA games and are a waste of a hangar slot.
These are just part of the reasons why I decided to quit back then. I felt that I was offering nothing to my team. Seeing mostly dashbots, Ancilots, and other energy shield bots, in the field, who the fuck am I going to shoot?
Is RDB terribad?
I don’t believe they are but there are better midrange options. Dragoons, for example, shoots from 600m and can deal decent damage. Zeus-class and Calamity-class weapons can poke from around 600, and the latter is even able to shred targets at close range. Still, I can say that there are no other options that can do instant damage with very minimal exposure like RDB does.
I just got back to the game less than two months ago. I was in Gold league then. I dusted off my hangar, finding a level 12 MK1 shotgun Golem, shotgun Gareth and PunThunder Inquisitor, and two RDB Griffs with level 8/9 RDBs. One Griff was 6, the other was 7. After seeing the Pantheons, the Ragnarockers, and the Dragonbots, I knew my hangar needed major overhaul. I only got 5K gold (was expecting more, found out there’s no more gold for returning players), which I spent on an Avenger for Quizzie. I decided to work on it as it’s the best that I’ve got. After some matches, I immediately removed the Golem from my hangar as it’s not pulling its weight.
I remembered the last bots that I enjoyed most before taking a break were Docs with Tulumbas/Orkans, so they went in. One of the Griffins became plasma DB. After several tests, I noticed that I’m still not doing good with my hangar. My shotgun bots would do good on some games and shit the bed on others, especially the Gareth which would either go John Wick or gone in 40 seconds. I needed consistency very badly.
While Doc Tulumbas/Orkans were very close to my heart, I noticed that it underperformed. On the other hand, the single RDB Griffin did most of the lifting, taking down two to three reds before going down. I decided then to go with two RDB Griffs, turning the Doc into an Orkan 1:1 bot (kills one red and then dies immediately afterwards). I decided to invest more into my RDBs instead of the others as I felt that the only way for me to match the newer bots is to go outside of shotgun range. I just utilized the Inquisitor as a beacon defender since the RDBs are poor in holding down beacons especially against tanky bots.
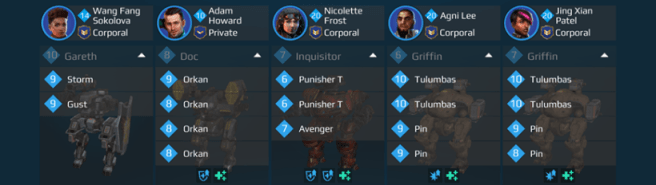
The hangar that got me from Gold through Diamond looked like this:
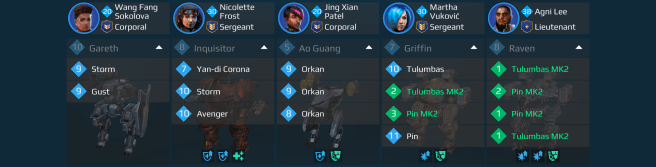
In case anyone’s wondering if I got meta bots, the answer is no. As I’ve said before, I have a strange inclination to non-meta setups. I’d refuse to play a meta setup unless I’m having fun with it. This is my current hangar:
I was only able to get MK2s from the 1g event. My original plan was to get all RDBs to level 12, MK1 and get another Raven. The recent changes to MK2 made me consider getting my weapons enhanced.
I can say that the true MVP of my hangar is the Raven although I have the Inquisitor as a backup whenever I need a brawler. I believe that every hangar needs a brawler and close-quarters combat is a fundamental aspect of the game that needs to be learned by every pilot.
Piloting the RDB
As mentioned above, RDB is a burst damage midrange setup. Its advantage over other setups is the ability to deal high damage in a very short amount of time, with the downside of long reloads. Because of this, it’s best to go with peek-a-boo and hit and run tactics, using covers whenever reloading. Staying outside of brawl range (350m) is highly encouraged as weapons on this range are stronger than RDB in terms of damage and/or reload.
Rocket Splash
It is important to note that RDBs deal area of effect damage. This gives it the ability to damage enemies behind cover as shown in the image below.
The splash radius is significantly large (I’ve read somewhere that it’s 20m to 30m but can’t find the source) and you’ll be able to hit most enemies behind structures as long as you can trace a straight line from your bot to the “red box.” I feel the splash can go farther than that. But to be safe, stay within the box. You can fire a “tracer shot” instead of releasing an entire salvo, but run the risk of enemy repositioning to avoid splash. You can hit a target at 510m if you will manually aim, but if your target at 500m suddenly moves outside RDB range, there is a tendency that your turret would tilt up and you’d end up firing at the wrong direction.
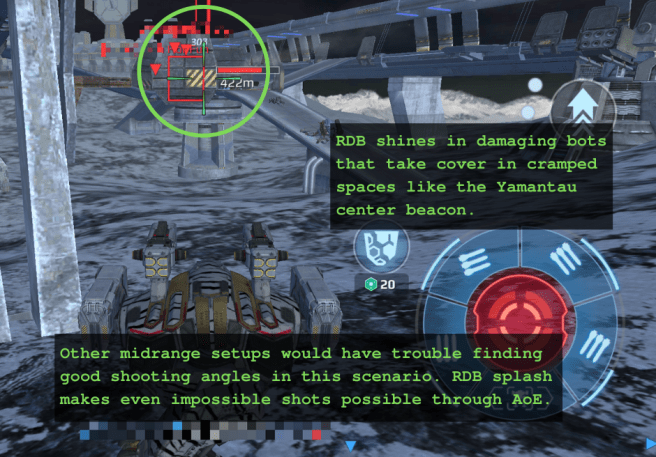
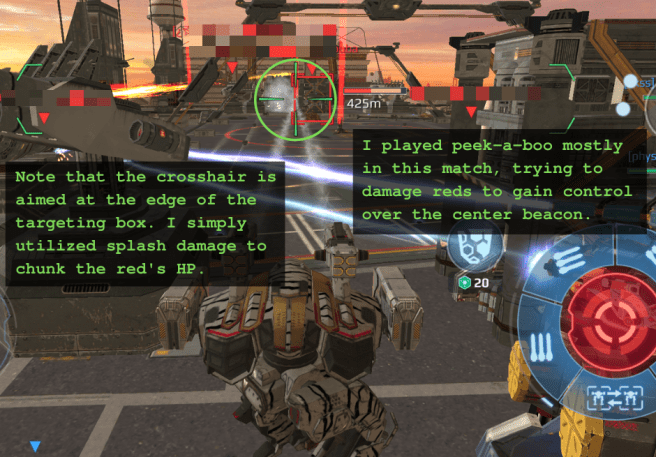
RDB’s AoE is strong against grouped up enemies, especially those who huddle in enclosed structures like Yamantau center beacon. In the above game, I basically went for “exposed red boxes” and was able to take some enemies down or “flush them out of the hole,” so my teammates can finish them off.
If you don’t have QR equipped, you can use rocket splash against Stealth bots. You can use walls, bots, or terrain elevations to trigger rocket explosion.
Positioning and Zone Control
RDB is excellent in zone control. On the images above, I provided supporting fire. My goal here is to soften up the enemy beacon defenders, so our team can make a run for it.
Some players may hate this playstyle of outfighting, but this is the way to play to your strengths. You’ll be heavily outgunned when you go in brawl range, so I’m heavily stressing the importance of not brawling against a legit brawler.
The image below gives a rough idea about zone control.
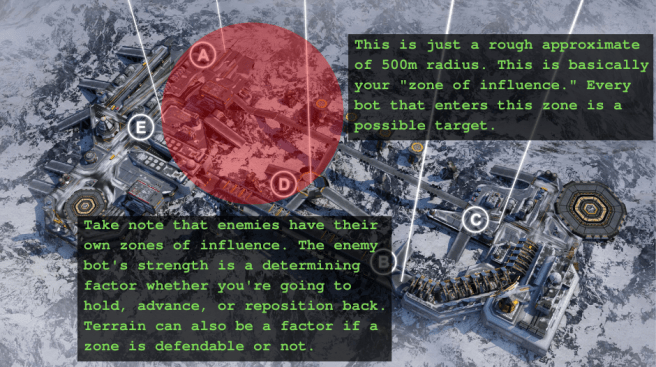
Why is this important? Well, controlling a strategic zone allows your team to technically mark the area as your own. Controlled areas around a beacon will help your team easily defend, while controlling red beacon areas gives access for beacon liberation. You can also make some zones impassable to the enemy team without them taking heavy losses. In TDM, having a larger owned territory allows a team to slowly suffocate the enemies off the map.
Positioning plays an important factor in controlling zones. Having a good high ground with covering structures gives an RDB pilot a safe area to reload or wait for cooldowns. Jumping RDB setups favor these types of terrains as they can just pop up, shoot, and get back in cover before the enemy can retaliate. Jump pilots should be wary though since the enemies can mark them anticipate the jumpshot.
I’ve stressed a lot of times in this writeup that RDB, especially Tulumbas, has long reload times compared to other weapons. Because of this, making every shot count is crucial to be able to contribute to the team. Wasting rockets lowers your burst potential, which is what you bring to the table. Be wary of the environment as rockets can tend to get entangled on terrain elevations.
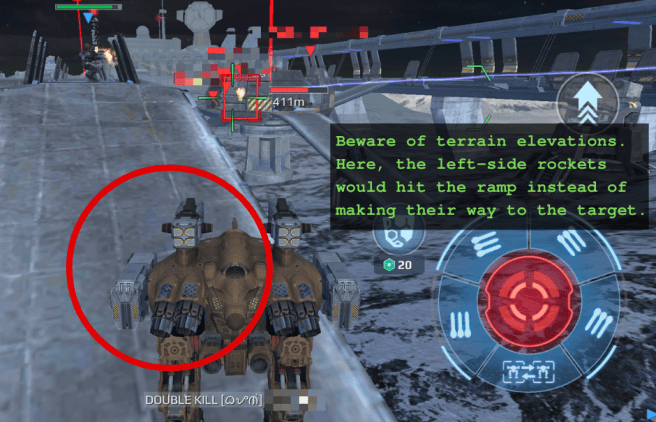
It really sucks not being able to finish your target just because some rockets hit the ground instead of making their way in. And because you failed to take the enemy down, it might even have the chance to close in and retaliate while your weapons are reloading. Rolling hills can often be a problem, so try to be on a higher ground and imagine a straight path from your weapons to your target.
Targeting
Prioritize low HP damage-dealers like Ares, Ao Jun, and Leech. If possible, try to mark them and get a good flank to take them down. With my setup, I focus on Ares and wait for them to use their shield. If I have a perfect shot, I’d immediately activate Shieldbreaker and empty my rockets just to be certain that they won’t be able to panic press their shields. Most of the time, I wait for them to go out in the open and activate their shield. That’s usually where they’re most vulnerable and don’t have time to back off.
For Ao Jun, it’s a waiting game. You’d have to wait until they land (unless you have QR). Some Ao Juns would wait for you to fire your rockets and then carefully time their flight to avoid them. That’s why I try to make sure they’re not aware that I’m marking them. You can also bait them out by firing a rocket or two.
Leech are tricky ones. You’re screwed if they carefully timed your rocket release and then Repulse you. I try to take them down if they’re preoccupied with my teammates. I make sure that it’s not latched on a teammate though.
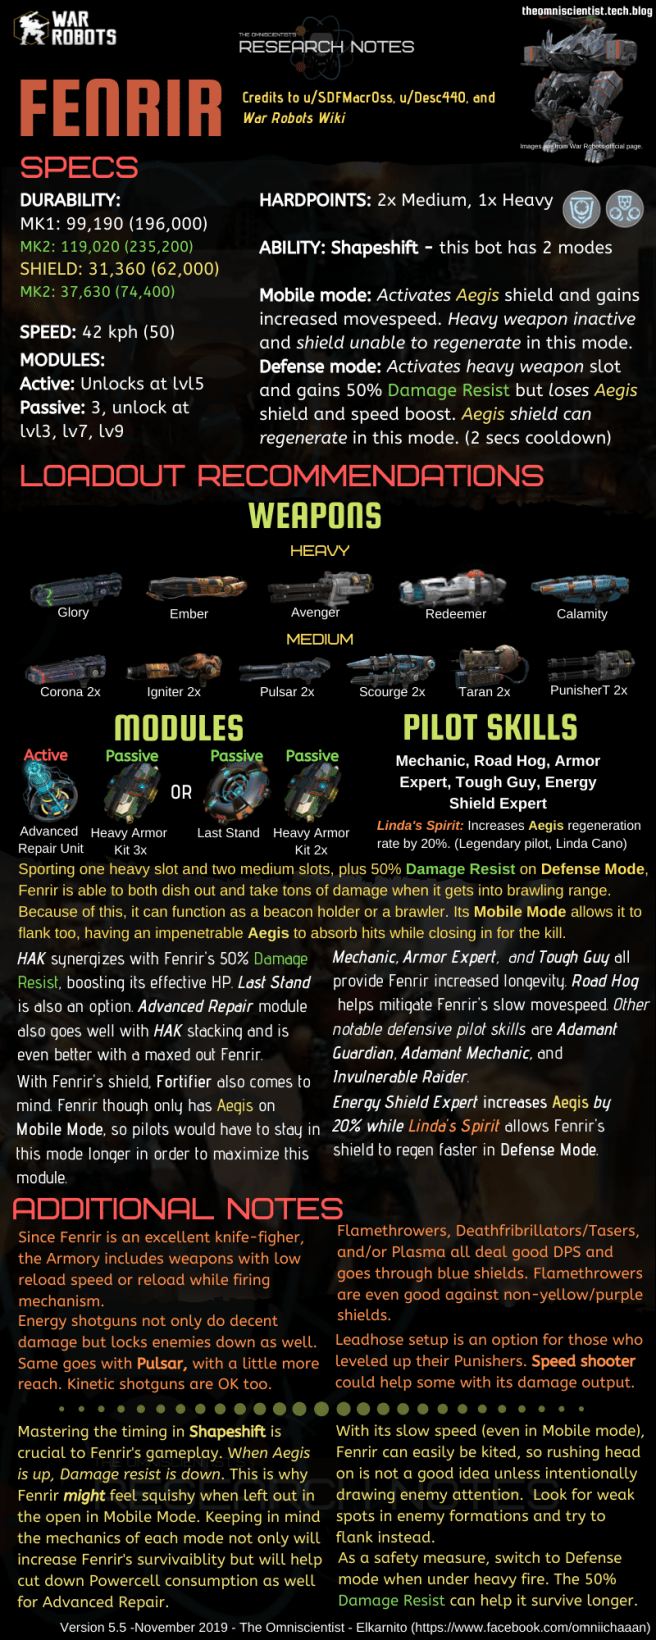
Avoid hitting tanks. Traditional Falcons and Fenrirs are the bane of my RDB’s existence. Most of the time, they can outsustain your damage output. Energy shields and anciles can also be a problem, but since Shieldbreaker came, they were not much of a threat.
EDIT: As of 5.6 patch, Titans were introduced into the game. I’d include them to the list of things to not prioritize unless they need to be disposed of. If possible, just outplay them by getting beacons as they’re rather slow to respond anyway.
Platforms
What are the things to keep in mind when choosing an RDB platform?
I believe Redundance is the first thing to consider when looking for an RDB platform. What I mean by this is does the bot’s hardpoints allow you to place multiple rocket launchers? Since you’re basically stacking up damage and that means carrying more weapons, being able to spam launchers would mean a lot. Personally, I would set the baseline to the classic RDB Griffin — two Pins + two Tulumbas. The setup has been proven to work and is easily accessible by newer players. Three Tulumbas would also work, with a close damage output to 2Pins/2Tulumbas. However, a four-Pin setup, in my opinion, lacks damage output to be significant. It might work in lower leagues, but as you go up, you’ll gradually notice the difference and you’d want power in your salvos.
Mobility is my second consideration on setting up an RDB bot. 500m is easy to close in especially on newer bots and with the mobility creep. You should be able to reposition quickly after unloading your clips while waiting for full reload. Also, having good mobility lets you to be more creative with your shots. You can flank enemies and rain rockets from their blind spots or move from cover to cover, bursting down enemies when clips are full. Lastly, RDB range is short compared to other midrange setups. On a mobile bot, you can close the gap and be able to deal damage and flee for cover.
The last thing that I thought of is durability. In the absence of mobility, your bot should be at least able to take return fire while waiting for full clips. It would be a waste if you’re only able to do one alpha strike and immediately get blown up. In lower leagues, Leos and Fujins can be possible platforms. Durability is not much of a factor though for mobile bots with a good pilot.
So, from these, what would be the perfect RDB bot? I’d say Griffin is the best, not power-wise, but budget-wise, since you’re most probably just using RDBs due to lack of other options and would be switching once good comp weapons are available. For overall RDB specialization, Raven would be the best platform for me as it possesses both redundance and mobility. The 20% damage bonus on jump is like a free MK2 (or an MK3 if you have them maxed). You can check out Lottie-Rose’s page if you want to see RDB Ravens in action.
Next would be the Spectre. Damage-wise, it edges out Ravens with its four medium hardpoints. It’s beaten by Raven in terms of mobility, having the same movement speed at max. Stealth gives it a safer jumpshot in the absence of Quantum Radar in the opposing team.
The third place I’m probably giving to Ao Guang. With three medium hardpoints, it has good damage output while its homing missiles allows it to finish off low HP reds. Its flight capability gives it more airtime to get better firing angles. Damage Resist while in the air ensures that it will not get quickly vaporized when doing bombing raids. Still, most players would advocate a Scourge setup rather than RDB for Ao Guang. But if you’re thinking of a safe, budget setup for this dragon bot, RDB is a good consideration.
Avalanche/Tulumbas Inquisitor has been in my drawing board before. Unfortunately, I don’t have access to Avalanche plus I’m not sure if it’s that worth to workshop. Adding to that is the unload time of Avalanche which doesn’t match Tulumbas’. If anyone has given it a try, please share your thoughts.
How about Docs, Leos. or Fujins? Or Avalanche Butch/Fury/Behemoth/Falcon? Or even Tulumbas + Avalanche Inquisitors? Well, I am by no means discrediting other setups. I just believe that in WR, you should aim to get the bang for your buck. Cost-efficiency is essential especially with the game economy. I just feel that RDB Griffins are too easy to get and if you want an upgrade, just get a Raven, transfer the weapons, and voila! You got yourself the best RDB setup without wasting too much resources. You don’t even have to upgrade your Griffin unless Pixonic decides to give incentives on maxing out old gear. Also, I think that Tridents would be better for bulkier bots as they have farther range and are cheaper to get.
If you’re planning to get RDB Spectres (for whatever reason), Docs would probably be a good starting platform as you won’t be wasting resources on Pins. Doc moves faster than a Griffin and can maneuver easily on the ground. Just be careful on switching weapons since the other mode has a wider gap between the two arms. Doing a burst-switch-burst could get tricky here as the wider wingspan tends to make missiles get tangled up in pixels. Also, there are times when the enemy repositions before you can switch and fire your secondary weapons. I’m not sure if it’s just psychological effect of having narrower arms, but I feel that Doc can do more “through the hole shots” as its rockets more compact. I even called this surgical shots as they felt more precise plus it fits the Doc.
All in all, it’s just a matter of getting the most out of your bot. Quad Tulumbas Leech might have the damage output of a Spectre RDB, but is it worth it? With its ability to effectively brawl, it would be a waste of a bot, especially with Storms being relatively cheap. For me, if a bot’s forte is brawling, it should be set up as a brawler.
Modules, Pilot, etc.
Personally, I have only used Shieldbreaker and Quantum Radar. I consider my RDBs as specialized setups, with the specific aim of countering a meta strat. At the moment, I’m running solely Shieldbreaker to take Ares and the occasional Anciles down. I just love the way Ares pompously struts in the field, seemingly puffing its chest out only to get blown to kingdom come by a salvo of rockets. I can even imagine their surprise and frustration while they decide to back off or use panic Phase Shift.
I used QR before against Lokis and Ao Juns but felt its duration to be too short to be effective. The wonky targeting also messes up a lot, you’ll end up wasting much of the duration cycling through enemy bots. Against Ao Juns, I just bait their flight and back away, waiting for an opportunity to strike back.
Phase Shift is probably the best outside of QR and SB. It gives you some respite while reloading if the enemy manages to close in. It’s also quite handy in surviving deadly jumps when in Griffins or Ravens. I just personally dislike it due to the amount of powercells that it consumes.
Deathmark is a good option too if you want to boost your damage some more. Haven’t tried it though. Perhaps if I feel that I don’t need SB or QR, it would be the next in line.
For passive modules, Nuclear Reactor or Thermonuclear Reactor would be the best since you’ll be doing hit and run tactics anyway, plus you need every possible tool to amp up your damage output.
Pilot skills would always depend on the bot. The cookie-cutter setup of Roadhog, Armor Expert, and Mechanic would work. For my Raven, I’m using Wonderworker. The legendary pilot, Adrian Chong, adds more ooomph to your burst damage output.
Camp Nights
RDBs are often seen as campers and I believe they potentially are. Still, it all depends on how you pilot it. To be effective, you must be aggressive. It’s as simple as that. Being aggressive doesn’t mean charging in towards the reds and going down after taking an enemy. That’s just plain stupidity. Don’t just wait for opportunities. Make them. Instead of hiding behind a wall and wait for the enemy to come into range, how about trying to circle around them and find a good sniping site?
A successful flank can benefit your team by being able to take enemies down or forcing them to reposition. Some reds may also try to take you down and this might relieve some pressure in a contested zone.
Don’t stay in one position for too long. Map out strategic areas where you can safely shoot reds then move from cover to cover to that destination. Always remember that damage is the only thing that you can bring to the team. You got no heals or disables (unless you have a weird lockdown ammo setup). Make sure that you’re always dealing damage.
FINAL THOUGHTS
Why do I RDB? Well, they’re fun (for me, at least). Ask the Griffin Girl and she’d surely say the same. There are times that I get frustrated with fighting shifty metabots and tougher-than-nails TraFalcs. I just enjoy the small victories that I get and try to play smart (except for occasional lazy tunnel visioning). When I lose, I make sure that I’m at least at the top.
Do I recommend RDB? Hell, yes, especially for newer players who want access to midrange damage setup. RDB Griffins are rather cheap to come by and you can have one in your hangar. But if you’re a highly competitive player and want to go up the ranks, I don’t think it’s the best option for you. Stick with Avengers and shotguns and use a metabot. I’m not saying that RDBs are impossible in champs. Niche setups do work, but then the climb wouldn’t be easy.
Anyway, if you’re still reading, thanks for the time and the effort. I hope you enjoyed or at least learned something from this.
See y’all in the battlefield.
Like and follow my Facebook page for updates.

 Modules (and powercells), since they’ve been introduced to the game, had impacted War Robots (well, I guess Yan-Di is to be blamed for this according to WR lore) in a lot of ways. Shieldbreaker has just been recently added, leading to the god of war’s downfall. Still, I believe that nothing is more game-warping than Phase Shift. It’s just annoying when you’re about to deal the death blow to your target only to see it go into incorporeal state. It’s not just a get out of jail card, but an outplay tool. It serves as a sort of virtual ability extender, especially on Leech. Coupled with Foolhardy Quartermaster and Last Stand, it adds a lot of invulnerability to the game, which in my opinion, shouldn’t exist in multiple forms, especially for a shooter game.
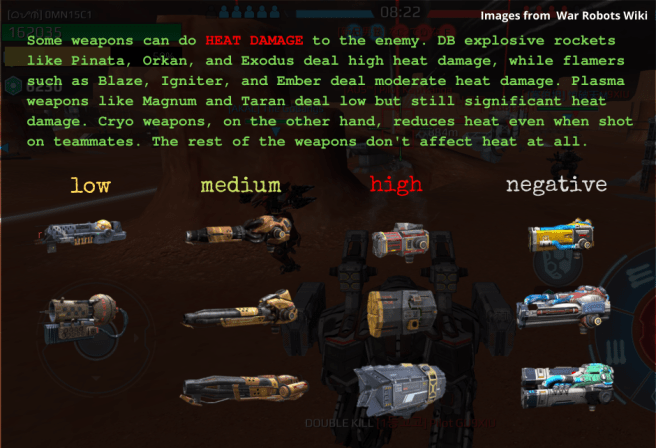
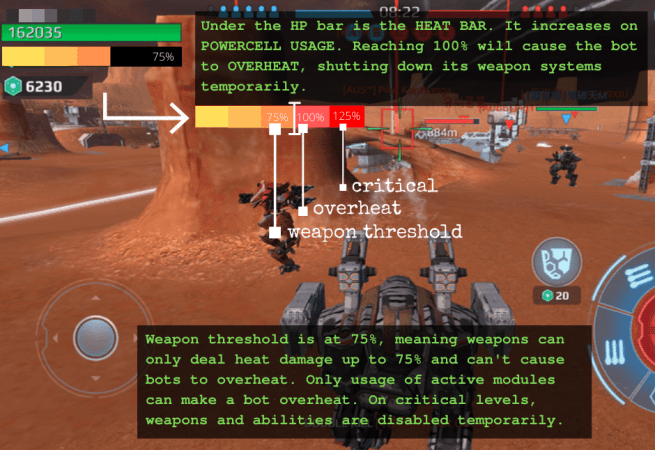 As per the image, getting to 100% heat will temporarily shutdown weapon systems, while going over that would disable both weapon and bot ability systems temporarily. I said before that weapons also cause heat damage, right? Heat damage is maxed out at 75%, so that they can’t disable enemy bots by themselves.